|
Sandbox 2 Manual
|
   |
   |
FacialEditorRef
|
Sandbox 2 Manual
|
|
|
The facial editor is a tool for creating and editing the various asset files described above (except for the model files, which are created elsewhere). It provides a graphical interface for creating expression libraries and for using those expressions to create sequences.
The image below shows an overview of the FE and its subwindows.
Note! The FE layout is user-customizable, so the editor may appear different for different users. 
The facial editor interface is divided into several subwindows or panes, each of which is used to edit a different aspect of the facial animation.
These panes are as follows:
In addition the Facial Editor has a Main Menu containing several pull down menues.


The preview window shows a character on which the selected expressions and animations can be previewed.
It can show any model supported by the engine as long as either the main mesh or an attachment features at least one morph target. The file that is currently being displayed is shown in the title text of the pane.
The model being shown can be changed using the [LINK] option. Various preview options can be changed using the Preview Options Pane.

This pane provides options to control what is shown in the Preview Pane. Many of these options are the same as those provided in the Character Editor.
|
LookIK |
Causes the model to look toward the camera, using spine, neck, head and eye bones together. |
|
LookIK Eyes Only |
If LookIK is enabled, move only the eyes. |
|
Show Eye Vectors |
Show lines pointing in the direction of the eyes bones. Used for debugging. |
|
Look IK Offset X |
Specifies the offset of the LookIK Target on the x-axis relative to the center of the camera. |
|
Look IK Offset Y |
Specifies the offset of the LookIK Target on the y-axis relative to the center of the camera. |
|
Procedural Animation |
Enable procedural animation of eyes and eyelids for automatic twitches and blinking. (1) |
|
Display Physics |
Draw the physics meshes of the model. |
|
Wireframe |
Show the model as wireframe. |
|
Grid |
Toggles the grid display along the z=0 plane. |
|
Lighting |
Toggles lighting on the model. |
|
AnimLights |
Toggle between static light position and orbiting lights in the scene. |
|
BackgroundColor |
Alter background colour using RGB values. |
|
ObjectAmbient |
Choose the ambient lighting for the model. |
|
LightDiffuse1 |
Alter light 1’s diffuse colour using RGB values. |
|
LightSpecular1 |
Alter light 1’s specular colour using RGB values. |
|
LightDiffuse2 |
Alter light 2’s diffuse colour using RGB values. |
|
LightSpecular2 |
Alter light 2’s specular colour using RGB values. |
|
LightDiffuse3 |
Alter light 3’s diffuse colour using RGB values. |
|
LightSpecular3 |
Alter light 3’s specular colour using RGB values. |
|
ShowTangents |
Display lines along the tangents of each mesh vertex. |
|
ShowBinormals |
Display lines along the binormals of each mesh vertex. |
|
ShowNormals |
isplay lines along the normals of each mesh vertex. |
|
ShowSkeleton |
Display underlying bones. |
|
ShowJointsValues |
Show debugging information for bones. |
|
ShowShaders |
Display currently used shaders. |
|
ShowSkyBox |
Unsupported. |
|
ShowTextureUsage |
Unsupported. |
|
ShowAllTextures |
|
|
No LOD |
Always render using base mesh - never use low LODs. |
|
ShowOcclusion |
|
|
DisableVisibilty |
|
|
FOV |
Set the Field of View (can be used to zoom in). |
(1) Procedural animation must also be enabled using the console command ca_face_procedural=1 (or 2 or higher).

This pane shows a list of expressions in the current library and provides for each of them a slider control.
Manipulating this slider control allows the expression to be previewed in the Preview Pane. Multiple sliders can be manipulated simultaneously, and their effects will be cumulative.
The Effectors Slider pane contains two tabs. The first one is called Morph Targets, and shows only the expressions that are simple morph targets. The second tab is called All Effectors and shows all effectors in the current library.
An expression can be quickly created from the current slider positions using the Effector Library Pane. This can be an efficient way to create new composite expressions.
To the left of each slider is a check box that enables/disables the preview of that effector.
Turning this box off is equivalent to setting the slider position to 0. On the far right of each slider is a control for setting the balance of the effector in the preview window.
Expressions can be dragged from this pane to the Expressions Explorer Pane to add sub-expressions to compounds, or to add an expression to a folder.
To clear all previewed expressions quickly there is a button at the top of the pane called "Clear All".


|
Weight |
Slider to move the morph target from neutral position to negative or positive values. |
|
Val |
Displays the position value of the slider in numerical form. |
|
Balance |
Control the balance factor or symmetry or the morph. |

|
Weight |
Slider to move the effector from neutral position to negative or positive values. |
|
Val |
Displays the position value of the slider in numerical form. |
|
Balance |
Control the balance factor or symmetry or the effector. |

There are two halves to the pane. The left half is the Expressions Tree View, showing the composition of the expressions in the library.
The expressions can be grouped into folders for organizational purposes.
Just as expressions are shown as children of folders in the tree view, expressions have their own children - these are the sub-expressions that make up the compound expression. The icon next to each item indicates the type of expression, either a compound or primitive.
If the expression is a morph target, there is no ability to edit it - it is fully determined by the model asset file.
For a bone or attachment expression, there is an edit box for specifying the bone or attachment to manipulate, and a series of controls for specifying how much to move/rotate the object for each axis. Angles are in degrees.
In the case of compound expressions, the pane shows a small window for each sub-expression, along with a curve that maps the input display value to the display value for that child.
This curve can be either linear or a spline. If it is linear, the only way to edit it is to change the slope of the line.
This can be done by right clicking and selecting change weight.
If the curve is a spline, then it can be editted using the mouse. The spline is determined by placing control points.
A control point is shown on the spline as a small square. These points can be dragged around using the left mouse button.
Double clicking on a point deletes it; double clicking anywhere else on the curve creates a new control point at that position.
Above the sub-expression controls there are two sliders.
The top one is used to preview the expression, by setting the display value somewhere between -1 and +1. The bottom slider is used to set the balance of the expression in the Preview Pane.
Above the sliders there is a toolbar. This toolbar shows the value of the slider as a numerical value.
There is a play button that allows the preview to continue in real-time.
The three buttons on the right can be used to set the preview value to minimum, maximum or zero.
Expressions can be dragged from their current position to another position in the tree.
This will have the effect of adding the expression as a child of the target expression. However it will also remain in its previous position - there will now be an additional reference to it in the library.
Expressions can also be dragged from this pane to the Sequence Pane to add new expression channels to the sequence.
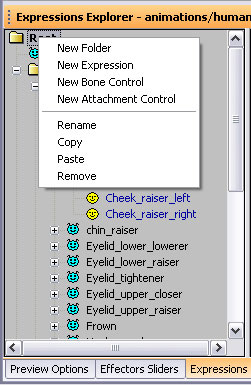
Within this view the user can define the existing morphs in the character and compose them into expressions using a right click menu interface (below).

|
New Folder |
Create a new folder. |
|
New Expression |
In this case the user is given the option of adding the existing expression as a child of the selected one. |
|
New Bone Control |
In this case the user is given the option of adding the existing expression as a child of the selected one. |
|
New Attachment Control |
In this case the user is given the option of adding the existing expression as a child of the selected one. |
|
Rename |
Rename an expression or folder. |
|
Copy |
Copy an expression. |
|
Paste |
Paste an expression. |
|
Remove |
Remove expression or folder. |


Expression Value: Time value from -1.0 to 1.0.

Animate Expression Button: Plays the morph/expression sequence.

Toggles play button to start at -1.0 (off) or from 0 only (on).

Fixed Value Button: Set slider position to 0.

Fixed Value Button: Set slider position to -1.

Fixed Value Button: Set slider position to +1.

Expression Preview Slider: Top slider sets expression from -1.0 to 1.0.

Expression Balance Slider: Lower slider sets balance from -1.0 to 1.0.

Spline Display. Defines how morph shapes blend in over the time an expression (multiple morphs) transition from minimum amplitude to full amplitude.

This pane is used to edit the sequence itself. It is divided into four main areas: the Sequence Tree View, the Curve Track View,Audio Track and the Sequence View Toolbars.
The Sequence pane displays all related information about the sequence from expressions, to audio and the curves/keyframes themselves.
Allows the creation of a list of available expressions which can be directly animated within the sequence. These are assembled by adding shapes and expressions from the expression library into the tree view.


|
New Folder |
Create a new channel folder in the sequence. A dialog is displayed asking the user for the name of the folder to create. |
|
Rename Folder |
Only appears if a folder is selected. A dialog is displayed asking the user for the new name of the folder. |
|
Remove |
Remove element such as a folder or an expression. |
|
Add Balance |
Adds a balance channel to the current folder. This channel will control the balance for all expressions in the same folder as it and any child folders. |
|
Add Selected Expression |
Creates a new channel referring to the selected expression as a child of the selected folder. |
|
Cleanup Keys |
This algorithm attempts to delete as many keys as it can without changing the shape of the curve more than a small threshold value. |
|
Smooth Keys |
Function to smooth over noise. Mostly used for mocap data. |
|
Remove Noise |
Function to remove noise. Mostly used for mocap data. |
|
Add Phoneme Strength |
*seems to be only appearing in special cases. |
|
Add Morph Target Vertex Drag |
Unsupported. |
|
Add Procedural Animation |
Unsupported. |
|
Add Layer |
Adds an editing layer onto the channel. See Channel Layers for more information. |
|
Delete Layer |
Deletes the editing layer of the channel. See Channel Layers for more information. |
|
Collapse Layer |
Commit changes made within a layer to base curves permanently. See Channel Layers for more information. |
|
Insert Viseme Shapes |
This is useful for producing fast layouts of visemes for keyframed lip sync. Expressions must have "visim" as a prefix in the name. |

Selecting a channel in the tree view causes its curves to be shown in the top part of the curve Track (selecting a folder is equivalent to selecting all of its children recursively). This control displays the splines, similarly to the sub-expression control in the Expressions Explorer Pane.
Curves can be edited here using the mouse. The curves are controlled by control points or keys, which appear as small squares. These can be dragged using the mouse. Double-clicking on a key deletes it, while double-clicking elsewhere on a curve creates a new key.
Multiple keys can be selected by clicking on an empty part of the control and dragging, creating a selection box. Holding down the control button allows keys to be added to the current selection set. When multiple keys are selected, they can all be dragged around at the same time.
Keys can be copied by holding down control and dragging. This creates a copy of all selected keys and begins dragging them.
Holding down the mouse wheel and dragging allows the display to be dragged around, allowing us to view different parts of the timeline.
The scale of the display can also be changed using the mouse. Scrolling the mouse wheel zooms in or out on the current position. Holding down the shift key and the mouse wheel and dragging the mouse left or right compresses or expands the time scale, while dragging up and down compresses the value axis. Effectively this allows zooming to be done on each axis independently of the other.
Above the curves there is a timeline control. This displays the time values along the time axis. Clicking on the timeline control sets the current sequence time to that position.
It also displays markers at each point on the timeline where a key exists for the currently displayed curves. These markers can be moved around and editted much like the keys can be, except that this restricts movement to the time axis (ie we cannot change the values of the keys), and each marker controls all the keys at that point on the timeline simultaneously.
The markers are also color-coded based on the number of keys at that point in time. A green color indicates that few of the channels in the sequence have keys at that position, while a red color indicates the opposite. Note that this color is determined by reference to all the channels in the sequence, rather than just the visible ones. This functionality allows the user to see whether a key is part of a major pose in the sequence, or whether the key is relatively unrelated to the positions of other keys.
The bottom part of the pane shows the waveform of the current sound, if one is loaded. This can be used to see critical parts of the sound in order to match up movements appropriately.
At the far bottom the current phonemes are displayed. These are usually generated by extracting them from the loaded sound (by right-clicking on the wave control). Once this has been done, however, the phonemes can be edited to improve the overall quality.


|
Lip Sync With Text |
Opens dialogue where text can be entered which matches the spoken audio and will generate an appropriate list of phonemes. If left empty the plugin does it's best to guess the phonemes necessary. |
|
Remove Sound |
Removes wav file from sound track. |


Play Sequence – Plays the sequence

Stop Sequence – Stops playback of the sequence

Facial Sequence Properties – Displays start and end times of the sequence or enables

Current Sequence Time – shows current sequence time.

Current Frame No – Shows frame number at current time.

Playback Speed – Shows current playback speed in percent.

Animate Skeleton – Plays back selected animation on the character.

Sequence Camera – Plays back camera animation loaded from a “sequence object” saved from a cinematic in trackview.

Overlap Sounds – Allows sounds to overlap when they have been placed in an overlapping fashion. When it is off, sounds are trimmed when a new sound begins to play.


Key All – Creates key for every track selected in tree view.

Zero All – Sets keys for selected tracks in tree view to 0 amplitude.

Amplitude – Adjusts amplitude of curve for a selected range.

Smooth – Smoothes noise of selected keys. Useful for mocap.

Smooth Value – Sets the value used for the smoothing operation.

Cleanup Keys – Removes keys based on user defined threshold.

Cleanup Keys Value – Sets value for cleanup operation.

Remove Noise – Attempts to remove noise based on user defined threshold.

Remove Noise Value – Sets value for remove noise operation.

The key tangent settings can be manipulated using the key settings toolbar buttons (see image above). There are seven buttons that affect tangents, each of which affects the currently selected keys:

Clear all tangent settings for these keys - the key tangents will be automatically calculated.

Set the incoming (from the left) tangent to 0.

The spline stays at the value of the previous key until it gets to this key.

The incoming (from the left) tangent will be linear to the previous key. If the previous key has a linear out tangent then the line between the two keys will be straight.

Set the outgoing (to the right) tangent to 0.

The outgoing (to the right) part of the curve will be a step - ie the spline will stay at the value of this key until it reaches the next key.

The outgoing (to the right) tangent will be linear to the next key. If the next key has a linear in tangent then the line between the two keys will be straight.

Zoom Extents horizontal

Zoom Extents vertical

Grid snap horizontal

Grid snap vertical
A channel layer basically freezes all the keys in the curve and allows the animator to create a new set of keys. These new keys control a new spline that gets added to the underlying data. By doing this, the animator can offset large numbers of keys quickly and intuitively. Once he is done, the layer can be collapsed, which removes the layer and updates all the keys to hold the new values.

Joysticks are user defined 2d controllers with a single manipulator that can be assigned to multiple morphs, expressions or other shapes in order to animate them in a graphical way – much like moving a physical joystick.
The Joystick pane is where the user can start assembling joysticks and wire them up to morphs, expressions or visemes that have been made available in the sequence view.

Toggle edit mode to resize or move joysticks in the view.
Toggle create key mode, when a controller is moved a key is automatically created.

Key all joystick tracks.

Zero amplitude of all joysticks.

|
Set Joystick Color |
Alters color of joystick. |
|
Delete Joystick |
Removes the joystick permanently. |
|
Joystick Properties |
Views properties page of joystick. |

|
Set Joystick Color |
Alters color of joystick. |
|
Set Horizontal Joystick Channel |
Assigns selected expression in tree view to the horizontal channel of joystick control. |
|
Set Vertical Joystick Channel |
Assigns selected expression in tree view to the vertical channel of joystick control. |
|
Flip Vertical Channel |
Inverts the control of the Vertical axis. |
|
Flip Horizontal Channel |
Reverses the control of the horizontal axis. |
|
Delete Joystick |
Removes the joystick permanently. |
|
Joystick Properties |
Views properties page of joystick. |

|
X Channel |
displays the expression assigned to the X channel. |
|
Y Channel |
displays the expression assigned to the Y channel. |
|
Flipped Checkbox |
Inverts the X or Y channel. |
|
X Scale |
Scales X component upon import. |
|
Y Scale |
Scales Y component upon import. |
|
Offset |
Offsets X or Y component upon import. |
The following section describes each pull down menu option and its function within the facial editor.
|
Open |
Open project. |
|
Save |
Save project. |
|
Save As |
Save project and specify name/location. |
|
Redo |
Redo operation after undo. |
|
Open |
Then the user will be shown an open dialog to select the file to open. |
|
Save |
Save expression library. |
|
Save As |
The editor will continue to display the previous document. This may change in the future. |
|
Export Selected Expressions |
These expressions can then be imported into a different library. The user will be prompted for the filename of the library to export to. |
|
Import Expressions |
|
|
Batch Update With Selected Expressions |
Files should be checked out by the user in Perforce, if necessary, before this operation is performed. |
|
Morph Check |
Display a list of all morphs that are referenced in the expression library that are missing in the currently loaded character. |
|
Open |
He will then be shown an open dialog to pick the sequence file to open. |
|
Save |
Save sequence. |
|
Save As |
The editor will continue to display the previous document. This may change in the future. |
|
Load Sound |
The sound will then be associated with the sequence and used for any subsequent lip-synching operations. |
|
Load Skeleton Animation |
The skeleton animation will then be associated with the sequence when it is saved. |
|
Batch Apply Expression |
Unsupported. |
|
Export Selected Expressions |
The user will be prompted for the filename of the new sequence. If any channel folders are selected, their children will be exported as well. |
|
Import Expressions |
If a channel exists in the current sequence, the user will be asked whether he wants to overwrite it or keep the current one. |
|
Batch Update With Selected Expressions |
Open a series of sequences and merge the channels that are currently selected in the sequence dialog into each one, replacing the channels if they already exist. |
|
Load Video Extracted Sequence |
Load a text file generated by the FaceAnim utility, used for motion capture of an actors face. Both curves and video are imported. |
|
Load Video (Ignore Sequence) |
Load a text file generated by the FaceAnim utility used for motion capture of an actors face, but ignore the motion data and loads the video only. |
|
Load Group File |
This can then be imported into a facial sequence for use in the Facial Editor. |
|
Open |
Open joystick file. |
|
Save |
Save joystick file. |
|
Save As |
Save joystick file and specify name/location. |
|
Create Expression From Current Positions |
Take the expression currently being shown on the character, as defined by the joysticks, and create an entry in the expression library that captures it. |
|
Batch Process Directory |
Batch processes a directory of audio, into fsq files using the same name as the audio file itself. |
