Adding and editing nodes
Introduction
Adding nodes to a graph can be done in many different ways, dependant on if an entity or a component node should be added. Any entity in a level except brushes or portals can be added to a graph. Entity nodes always operate on a specific instance of an entity in the level, while most component nodes are independent from entities and only need them as a target to perform certain actions on. The target of a node can be reassigned and changed as often as necessary.
Entity nodes
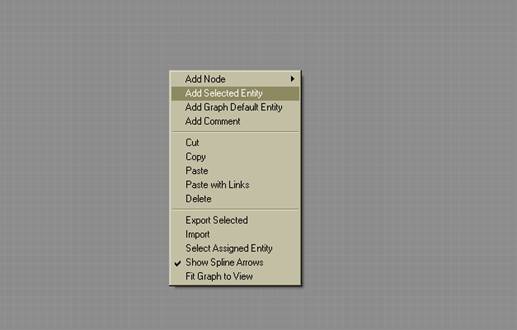
To add an entity node, first select an entity and then open the graph you want to add the entity to. Next, open the graph context menu by right-clicking on the main editing pane. Select ‘Add Selected Entity’ to insert the entity node at the mouse cursor position.

This procedure only works if an entity is selected. Additionally there is the context menu option ‘Add Graph Default Entity’, which will always add the entity which the graph is attached to.
Component nodes
Component nodes can simply be added from within the graph and don’t require any entity selected. Again, there are two ways to add these nodes: The context menu and the component node list window. In the example below an ‘EntityPos’ node will be added.
To add a new component node open using the context menu, open it by right-clicking on the main editing pane and select ‘Add Node’. A long list with subfolders will open up and a node can be selected from any folder. Select ‘Entity’ to open the folder with the entity related component nodes. Click on ‘EntityPos’ to complete the procedure.

The new ‘EntityPos’ node will now be placed in the graph at the mouse cursor position.
Deleting nodes
To delete a node open the node context menu by right-clicking on the node and select ‘Delete’. Alternatively a node can be deleted by selecting it and pressing the ‘Delete’ key. Once a node is deleted all the connected links are removed automatically.
Moving and arranging nodes
Nodes can be moved around by dragging and dropping them on the main editing pane. Multiple nodes can be selected by holding down the ‘Ctrl’ key and clicking on all the nodes to be selected. Alternatively the mouse can be used to pull a dragbox around all nodes to be selected. Links between selected nodes will be moved when the nodes are moved and will automatically rearrange.
Copying nodes
To copy on or more nodes, select the nodes to be copied and open the node context menu. Do this by right-clicking on any node and select ‘Copy’. All nodes including the connecting links are now copied into the clipboard. The nodes can be pasted from the clipboard to a graph by selecting ‘Paste’ in the graph context menu. The option ‘Paste with Links’ will paste the nodes from the clipboard including all connecting link. Shortcuts can be used as well: ‘Ctrl’ and ‘C’ copies selected nodes and ‘Ctrl’ and ‘V’ will paste them. ‘Ctrl’, ‘Shift’ and ‘V‘ will paste the nodes including the links.