|
Sandbox 2 Manual
|
   |
   |
Track View Editor
|
Sandbox 2 Manual
|
|
|
Animated movie sequences can be created with ease in the CryEngine2 Sandbox editor.

Included in the CryENGINE® 2 Sandbox editor is a powerful cut-scene editor, which allows you to sequence objects, animations, sounds, etc. into a scene which can be triggered in the game, and played either as a detached cut scene from the third person perspective, or from the first person perspective of the player as he plays the game. The system will be familiar to anyone who has used animation software like 3D Studio Max, but this brief guide will help those of you unfamiliar with cut scene editors to start creating simple scenes for your levels.
The cut scene editor is a little bit different to what you will have become accustomed to while learning the sandbox editor, and there are a few key concepts that relate to it that you need to understand, especially if you have never used a sequence editor before. These key concepts are:
The sequence is the cut scene itself, and for each sequence you can add a number of nodes for each object that you use, including the top level node of the scene itself which is created with the camera icon on the tool bar. For each node that you have, you can have a number of tracks, depending on what kind of node it is. A camera node can only have the default tracks of FOV, Position and Rotation, plus an events track, but an animated object like a Korean Soldier can have many more. Each track is measured in seconds, and has points marked on it to indicate where a sound starts, or where an object will be at that particular time. Each section of a track’s time is marked off by a Timer Indicator Bar, which moves across the track from left to right as the sequence is played. Any key that falls under the Timer Indicator Bar as it moves across the track becomes active.

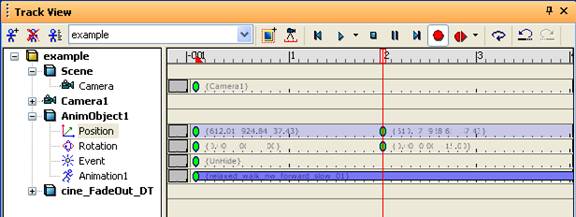
1 Sequence Tool Bar , contains the icons used for editing sequences.

2 Node hierarchy window , area where the components of the scene are displayed, elements can be added here by alternative right clicking in the white space.

3 Timeline , time display of the length of scene and where the scene currently resides.

4 Key editing window , area displays the sequence key frames and where certain events occur, this is where the majority of editing the scene occurs

The cut scene editor has no pull down menus, although each icon does have a roll over hint to remind you what it does.
The Sequencer Tool Bar
Track view properties window


Drop down selection box for selecting which scene is to be worked on.

Add Selected Node* , adds a selected entity to the track view

Add Scene Node,* adds the scene track to the track view, the scene track contains the high level components of the scene like the camera to be used.
Playback controls


Scrubbing the timeline, click on time bar to make the time slider jump to that position, click and holding will allow scrubbing of the time slider.

Sliding keys, click on a key frame to select it, a yellow line will appear, click and hold the key frame to slide back and forth to adjust timing.
Click and drag in the empty space to group select key frames for adjusting multiple keys at a time
Zooming the timeline in and out, make sure track view window is active and use the middle mouse button wheel while scrolling to zoom in and out
Position the mouse over the key to be duplicated, hold shift then left click the key, a new key should be positioned directly on top of the old one, continue too hold down lift click to drag the key to the desired time.
First select the key/s that are to be copied, while selected press (ctrl+c) Then move the mouse over the track of the entity you wish to paste the key frames into. (crtl+v) note, keys can only be copied and pasted between similar tracks, i.e. between the positional tracks of two entities.
Each entity supports multiple tracks, the “track” is where keys are edited to create the animated sequence, by adding multiple entities with the desired tracks complex scenes can be constructed.
The first node which is generally always required is the Scene Node, it contains the tracks for the high level components for the scene.
There are many tracks in total, certain tracks are only available if the entity supports them,

animObject1 with multiple tracks
The following tracks need to be added manually
The Scene track is slightly different to other entities which are added to the track view

Scene node with tracks
Additional tracks can be added to entities for additional functions, by default the basic tracks are only added when an entity is added to the Track view.
Also tracks can be removed from an entity, this is useful for keeping the Track view clean from un needed visual clutter.
Note that only entities can be added, brushes cannot be added to the track view.
Simply right click on the entity in the hierarchy section to display options, mouse down to add track and select the desired track to be added, note that different entity types have different parameters and that certain tracks can only be added for certain entities.
To remove a track simply right click on entity and select Remove Node.

Note its also possible to double click an entity in the tree view to select it.
.nce keys have been added to a specific track the key properties is required to select the desired function .
By right or double clicking on a key the key properties can be opened. The properties window will differ depending on the track type being edited.
Positional, rotational and scale key properties .

Values can be adjusted in here more precisely than dragging objects around in the view ports,
Select Node: selects the entity to be the look at target.
Manipulated Bones: filters the objects that are effected by the look at, eye is eyes only,

Animation track key properties

Start animation: selects that animation to be played on the entity, note, this option is only available if entity supports/has animations, the animations are referenced in the “.cal” animation file or as a “.cga” contained within the file.
Loop animation: loops.
Root not move: useful for animations that offset from the origin over time.
Speed: used to speed up and slow down animations.
A basic flow graph needs to be created for playing a Track view sequence, the flow graph node that is responsible for playing a sequence is found under Animations:PlaySequence,

Sequence
input field for sequence to play.
StartTrigger
when triggered will start the scene.
StopTrigger
when triggered will stop the scene.
BreakOnStop
when the sequence is stopped; by default the time slider will go to the very last frame and trigger logic, this can be useful for when a scene is skipped; you can still trigger all the logic and positional info on that last frame, this will option will overwrite that logic.
BlendPosSpeed
if a value is stated the game camera will take the value to blend to the Track view camera, used for making the transition from game to cutscene smoother.
BlendRotSpeed,
same as above but for rotational values.
PerformBlendOut
blends the end camera position to the player position, smoothing out transition from cutscene to gameplay.
Started
triggers output when the scene has started.
Done
triggers output whether the scene has finished by itself or if skipped by the user.
Finished
only triggers if scene finishes with out being interrupted by user.
Aborted
only triggers if the scene if stopped or skipped by user.
By attaching related entities to a common parent, assets can be organized into a more manageable hierarchy.

To attach entities together and create a hierarchy first in the menu select Group>Attach, once selected, select the child then select the parent, the entities will now be linked and by manipulating the parent the child will also follow.
If an entity has a parent it will be grouped under that parent if both parent and child are added to the Track view, this is useful for organizing entities

Example of plane_animObject with attached entity hierarchy
If the entities tree is minimised all the children entities will also be hidden underneath it, this is a nice way to keep the Track view uncluttered.
Basic object animation can be achieved in the Track view, using positional rotational and scale tracks,
To start animating the entity keys can be manually added in the Track view and there values adjusted in the Key Properties by adjusting positional, rotational and scale values over time.

Track view sequence by manually added multiple keys and adjusting the key properties over time.
A more effective method however is to work by manually manipulating the entity in the view ports and recording the movements,
With the record button clicked, and AnimObject1 selected, any movement in the 3d viewport of the entity will automatically be recorded in the Track view, simply move the time slider along to record various positions at different times.
First make sure the entity you wish to animate is added to the Track view, once added make sure it is selected then click the record icon, with the record icon depressed any movement applied to the selected entity will be recorded into the Track view at the current time, to add more keys simply move the track view time slider to another time and adjust the entity to the desired position, there will now be keys frames that the Track view will interpolate between animating the entity.
.--++ Animating Camera’s with key frame animation .
Basic camera animation is very similar to object animation except instead of manipulating the camera from a third person perspective it is possible to look through the camera you are animating to get an exact representation of what the camera will look like in the scene.
By default new manually placed cameras are locked, first they need to be unlocked,

In the top left of the view point right click and uncheck the “lock camera movement” option, this option will only be visible if you have first added a camera to the scene, next the record button needs to be selected in the Track view.
Again simply position the camera where desired at a given time then while the record button continues to be active move the time slider to a new time and reposition the camera, continue this process to get the desired camera movement.
The cameras “FOV” Field Of View can be animated by adding keys to the FOV track and adjusting the FOV key properties at specific intervals.
Certain features required for creating cinematic effects are only contained within the flow graph, in order to access these effects a bridge between the flow graph and the track view needs to be created.
A useful technique for using the Track view and flow graph together is to send events using trigger entities that send events to the flow graph to trigger flow graph nodes, time delay nodes can be used but are more fiddly when adjusting timing and also pose issues when a scene is skippable as the logic will continue,

The Track view above has an AreaTrigger “cine_FadeOut_DT” which triggers a leave event at 11 seconds, when this is triggered it will fire a port in the Flow Graph.
First place an AreaTrigger into the scene and add it to the track view, under the event track add a key frame where you want to trigger a certain event in the flow graph, in the key properties select for example Leave, now add this same trigger into the flow graph, when the Track view plays over this key it will send an output from the AreaTrigger’s “Leave” output port, this can be connected with a flow graph node to trigger cinematic effects, i.e. a camera fade.
When a track view sequence is skipped in game, the track view by default will still trigger all logic which is placed on the final frame in the Track view. This can be very useful if your scene requires heavy post scene clean up to hide entities specific for the scene.

Track view sequence with keys setup on last frame for post scene clean up.
For example, on a sound entity it can be useful to have a “stop” key frame in the event track on the final frame, this means that if the cutscene is half way through playing a sound effect, if the user skips the scene the sound will be stopped, other wise the sound will continue to play after the scene creating a undesired effect.
It is much cleaner/bug free to place event keys on the final frame to clean up the end of a scene, than to place multiple flow graph nodes to achieve the same after a scene has finished.
As a track view sequence is pre determined and camera movement is precise the ability to record them to a movie format is useful.
Possible for promotional work or if its decided to pre render the scene for fluctuating frame rate issues.
Cryengine 2 incorporates a system for frame by frame capturing that can later be complied into a movie format.
By using a few c_vars frames can be rendered into a local folder
The captured images are by default placed in the root directory off the game inside a folder called “CaptureOutput”
The following c_vars are useful for frame by frame capturing.
fixed_time_step 0.0 for default game play speed fixed_time_step 0.03333 for a frame rate of 30 fps fixed_time_step 0.04 for a frame rate of 25 fps
capture_frames 1, enables capturing of frames capture_frames 0, disables capturing of frames
capture_file_format jpg capture_file_format targa
Once the frames have been captured a third party application needs to be use to compile the frames into a movie format.
The layer system within CryENGINE® 2 helps in organizing assets into workable groups, and helps avoid accidentally manipulating unrelated assets.
By using the layer system in a production environment its also possible for multiple designers to be working on the same level and for the cinematic team to work on the same level at the same time as the level designers.

The layer panel in the RollUpBar
For each cinematic first create a new external layer.

Once you have created new external layers for the required number of scenes, simple make sure you have the layer you want to work on selected, this insures new assets will only by placed on this layer.

Also by only having the layer you wish to work on editable, this is shown by the arrow, you can avoid accidentally adding entities to the incorrect layers, and disturbing previous work.
Another useful workflow tip is to rigorously name every asset in the cine layer with a cine_x prefix, this becomes invaluable during debugging as any problematic asset can then be traced to the specific layer and the designer responsible.
Now any entity that is now added to the level will automatically be added to the selected layer, when the level is saved, this layer will be also saved, it is then possible to work on this layer separately from someone working on the main level .cry file and later re import it into the main level for a latest version of the level.