|
Asset Creation Manual
|
   |
   |
Exporting and Importing Animations
|
Asset Creation Manual
|
|
|
General Rules
Vehicle_b.cga – Vehicle object(s) and default animation. Vehicle_b_door1_exit .anm – Animation keys stored for the door open animation when a character exits the vehicle. Vehicle_b_door1_enter.anm – Animation keys stored for the door open animation when a character enters the vehicle. Vehicle_b_door2_exit.anm etc.

Change the controller types for position and rotation to TCB.

Create an animation for the objects in the scene.

The “Export File per Node” option, located just below the Export Nodes button in the group “Geometry Export Options” allows you to either bundle these 3 objects together in one CGA file or, when the option is checked on, will export 3 files separately. For now uncheck this option so we only have one file exported.
Next make sure that the CGA file type is selected in the Export To drop down box.

Next press the Export Nodes button. This will export the objects to the same folder that the source file is located in (which should be located somewhere in your game directory).
The file will assume the source file’s name unless you uncheck “Export File per Node” and check “Custom Filename”. This will allow you to select a unique name for the file by pressing the 3 dots (…) and typing in the name. This is not available for exporting multiple objects at once using the “export file per node option” however.

At the top left of the floating window is the file drop down menu. Click File>Open and navigate to the folder you exported your cga file to. After opening the file you should see the object(s) in the 3d view.
Each CGA file contains a default animation which is available from the animation list. Click the name “Default” to play the animation.

Start by creating a second additional animation for your object within your 3d package.
Navigate to the object export section of the exporter and click “Custom Filename”.

Click the button below with 3 dots (…) and type in a filename, using the name of the cga object you are adding it to as a prefix in the name.

For example test.cga contains the object you are animating, plus the default animation. In this case you need to name your anm file test_[?].anm where the question mark is what you want to call the additional animation.
Press the export nodes button. If the ANM file is located in the same folder as the CGA object, the animation will now be visible in the Character Editor animation list.
Preview the object using the guidelines in the CGA export tutorial above.
First create a mesh, a skeleton to deform that mesh and apply weights to it with a modifier such as Skin or Physique. Image shows basic mesh and underlying skeleton

Now create an animation for the skeleton – make sure you store your default pose either as a keyed pose at frame 0 or using functions like Set Skin Pose in 3dsMAX for example.
Make sure Add related bones and Add whole skeleton boxes are checked on. These functions check for the root of the character and automatically add it to the Bones export list. Select the mesh of your object and click Add Selected in the Object Export section of the exporter.

After doing this you will see the root of your hierarchy automatically added to the Export Bones list. This list only needs to store the root(s) of the chain of bones you wish to export.
Scroll down to the Bone Export area of the exporter. Notice the root bone is listed in the bone export list. Press the Export Bones button and choose a location for the animation. This should be within a path in your game folder so that the animation will successfully pass through the resource compiler. This will make sure that any compression settings you define in the CBA file (Crytek Batch Animation) used for batch processing files.
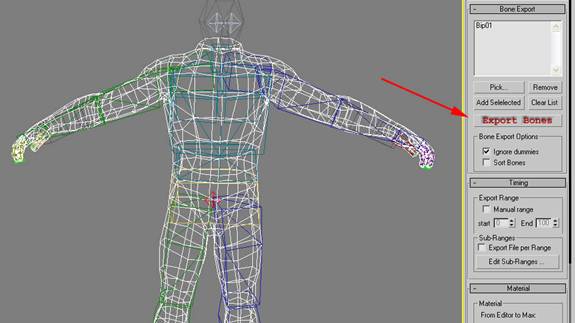
Select the Bip01 Spine bone; click Clear List in the Bone Export options and then Add Selected. This will add the bone “Bip01 Spine” to the node list. You are now ready to export the animation from the Bip01 Spine bone and all of its children in the hierarchy.
Once exported, the animation will only contain the tracks for the Spine and its descendants.
#filepath animations\human\male=
$Include objects\characters\human\ondemand.cal=
//-------COMBAT------- combat_idle_nw_01 combat\combat_idle_nw_01.caf=
The #filepath command points this particular file to a folder used only for male animations.
The $Include allows your character to read from multiple cal files. In this example we separated the cinematic animations in a list that is only loaded on demand (so these animations are loaded and unloaded from memory.
// simply defines a comment.
The last line is defining the name of the animation and its location in a subfolder of “animations\human\male” called combat. The name given on the left is what will be seen in the editor and does not have to match the actual animation’s file name.
For the SDK character we added this example cal file.
#filepath animations\human\male=
run combat\run.caf=
Create an example that is similar to the above and replace the name with the name of the animation you created. The cal file must be located in the same folder as your character and have the same name as this CHR file, except with the cal file extension.
When starting the editor using the above example the animation list will display one animation called run or if you replaced the names should show the name you gave the animation. Click to play it.
Start by first clicking on the fullbody animation in the animation list. You will see the animation looping in the 3d view. Below the Choose Base Character button you will see a dropdown box defining which layer is currently playing.

It should say “Primary”. If not, press the “Stop All” button, select the primary layer and start the animation again.
Next, select the Secondary.1 layer and click on the upperbody animation you exported earlier in the animation list. This will begin to play the animation using the tracks that were exported from the Spine down through its hierarchy. You should still see the legs moving in the same way as the fullbody animation, with the upperbody completely overwritten by the second animation.