Tank Setup
Tanks need special treatment, as they are a combination of .cga and .chr files. For general information about vehicle setup, please refer to
Vehicle Setup.
Sample File
Sample File:
General Setup in 3d applications
- The vehicle needs to "look" down the positive y-Axis (See picture).

- The tank treads need to be skinned characters. more general info about creating a skinned character can be found here.
Preparation before Export or Wheel/TankTreads Setup.
This is mandatory before setting up tank treads and wheels as Reset Xform is not working after applying the Physique-Modifier in 3dsMax (work will be lost)
Wheels Setup
Place the wheel object in the correct position. Place the wheel's pivot in correct position. (the picture below shows top View in 3dsMax. Type "Wheel" in the objects properties. (the picture below shows the 3dsMax Objects property window)

The wheel proxy must be simple enough to be recognized as cylinder by physics. Support for an additional detailed proxy (if the wheel's shape demands it) will follow.
Tank Tread Setup
* Create helper in the middle of the tank tread. Give it the same name as the tank tread plus a postfix "_root"
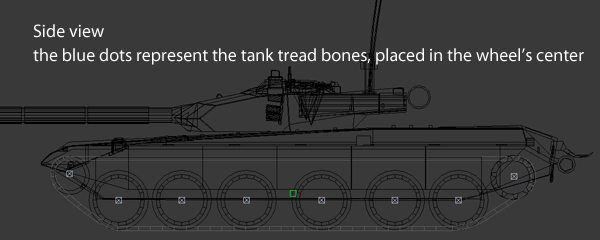
- Create a 2 link bonechain for each tank tread wheel and position them like in the picture below (see pictures). The first bone of the wheel needs to be named like the wheel plus the postfix"_bone". the child (terminator bone) needs to be named like the wheel plus the postfix "_term", i.e. "XYZ_term".
- The root bones of the wheel ("XYZ_bone") need to be linked to the null which was created in the first step ("XYZ_root")
- Assign a physique modifier to the tank tread (not the wheels) and choose "XYZ_root" as the first link within the physique modifier. Adjust weighting of the vertices on the tank tread.
- bones_sideview.jpg:


 tank.max