|
Asset Creation Manual
|
   |
   |
How to export a texture from Photoshop with the CryTIF plugin
|
Asset Creation Manual
|
|
|

Take a picture of your choice, we took a picture of an elegant and classic German car, and resize it to 512 x 512 pixels. Choose File\Save to create a copy on the hard drive. When the file requester shows up, choose CryTIF as the format:

This opens up the CryTIF Exporter Control Window.
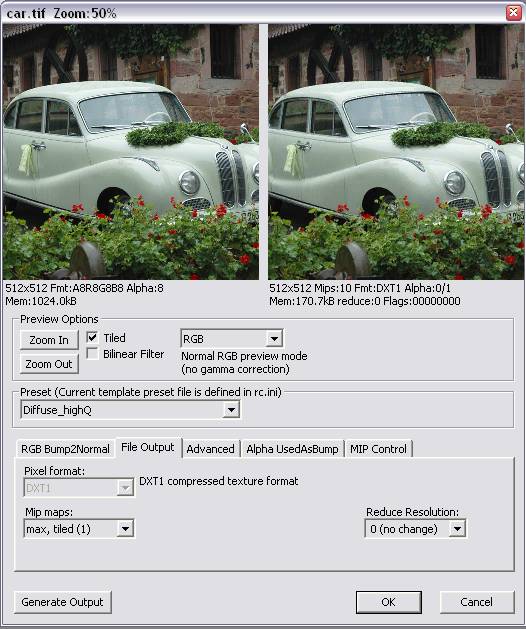
As we are about to save a texture for the diffuse channel, choose Diffuse_higQ in the Preset Settings. This will create a DXT1 dds file later on, which needs about 170KB , instead of 1024 KB as an uncompressed Texture. Compare the original quality and the quality in the preview window on the right side. Position the mouse pointer over one of the two previews and use the mouse wheel to zoom in and out of the pictures simultaneously.

Play around with the presets to get a feeling for the formats the Exporter is able to output data. We stick for this example with Diffuse_highQ
The lower part of the interface features Tabs. The most important ones, the ones you will check on every texture, are File Output and Advanced.

We keep the settings for Reduce Resolution at 0 as we do not want the texture to be scaled down on both axis by default.
Use this feature to scale down big source files automatically. We also want to create Mip Maps for the texture and keep the settings to “max”.

Auto optimize should be kept turned on for normal textures.
Only on very high spec this setting is disregarded. It automatically scales all textures over 512 pixels width or height. This was implemented to improve performance and optimize memory consumption. In most of the cases the difference between the 1024 pixel and 512 pixel version is a good trade off for better performance.
Keep the “Supress engine reduce” off. If you switch from High to lowspec, the textures are scaled down automatically to allow them to be loaded into the graphics card memory. This flag overwrites all the RC settings and keeps the original size throughout all the different quality settings. You want to use this on textures featuring text.
You want the texture to be streamed – in case of effects you might turn it off to make sure, explosions are displayed without any delay, caused by loading textures.
Press OK when you are done. This saves the Texture as a modified TIF file. It is now ready to be used in the CryENGINE®2 Sandbox Editor or in a MOD.
The big advantages will become apparent for teams who want to create a mod and share data – you only need to take care of the uncompressed source files (TIF and PSD), the dds will be created when you load assets into the editor. When you switch to a lower config Spec because you want to test if the performance of your mod is texture memory bound, you want to have the textures scaled down by the factor 2. This is not possible with pure .dds - only with the CryTIF files.