|
Asset Creation Manual
|
   |
   |
1st Person Characters
|
Asset Creation Manual
|
|
|
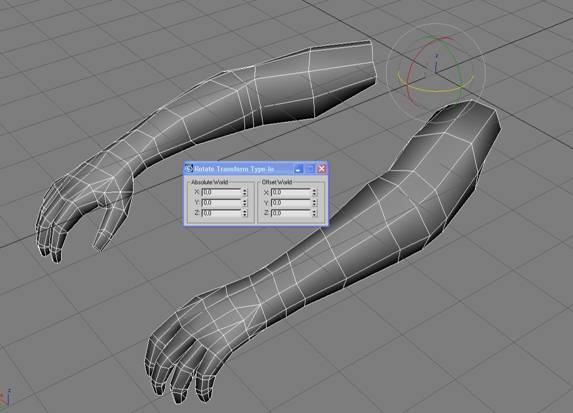
The local transformation of the mesh should be zeroed out for all axes. Also its pivot/center should always remain at the world center. (Position 0,0,0; Rotation 0,0,0)
Note:
Keep mesh/geometry at the world center with no rotation.
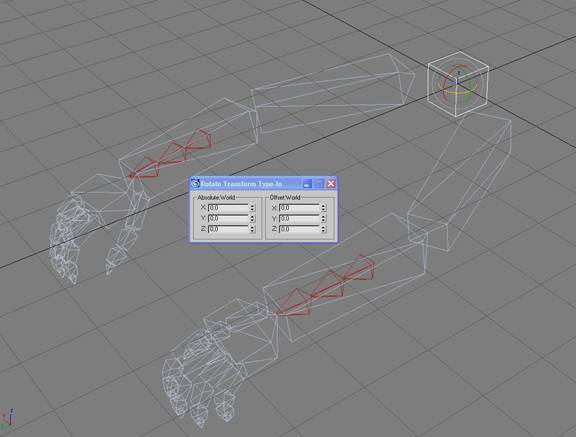
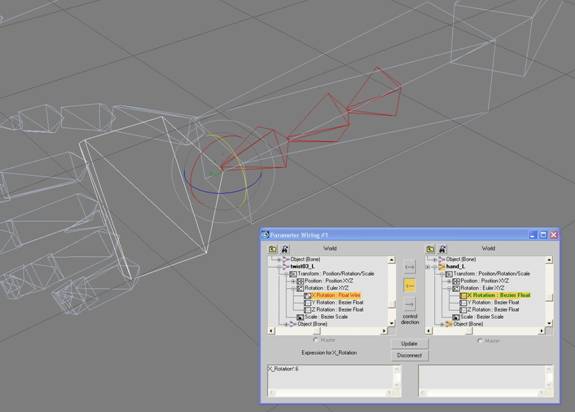
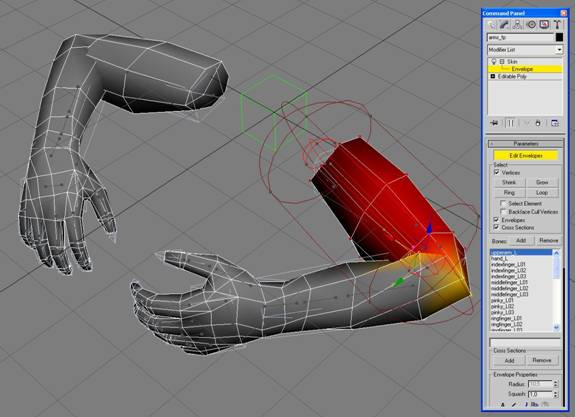
The three red coloured bones in the lower arms are twist helpers, and are used to help the deformation around the wrist. They have a simple expression applied to them which is connected to the hand’s bones X- rotation.
Note:
Now is a good time to set a position and rotation key on all elements of the hierarchy at frame 0. This way you will always have the option to go back to the “initial Pose” of the character.
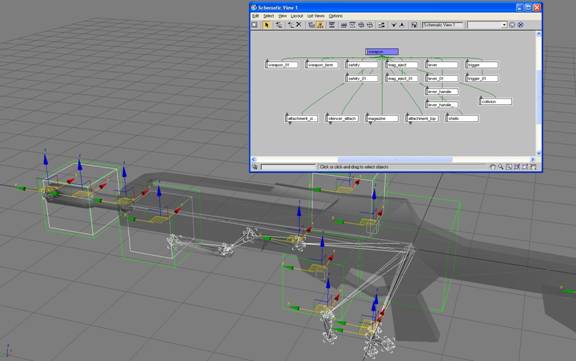
Here is the whole arm hierarchy in the schematic view.

The wrist helpers should be hidden after the envelope operator is applied, so that they won’t accidentally be animated. This would cause the applied expressions to become ineffective.
There is no need to keep the hierarchy the same structure we used here. Also changing the way the wrists are solved is possible.
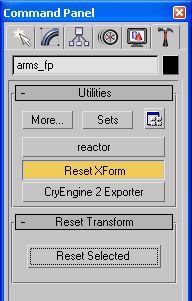
Always apply a “reset x-form” modifier and collapse it in the modifier stack, before you apply the envelope modifier. This removes unwanted transformations to the geometry, which could cause problems later on.
Which operator is used in max doesn’t matter. You can either use Physique, or Skin to weight your model. Both are supported in the engine.
Info:
Whenever a vertex is influenced by more than two bones, the weighting on the ones with the weakest influence gets deleted and gets normalized between the remaining two bones.
In our example Skin is used to weight the arms to the bones. The modifier is applied at frame 0, which also defines the “default pose” which was keyed earlier. This also defines the default pose in the engine and helps in debugging problems later on in the process.
Only bones which are necessary to deform the mesh in a proper way were added to the bone list in the modifier.
Info:
Bones in the hierarchy which have an underscore at the beginning of their name won’t be considered by the exporter. This keeps the size of the exported character low. In this case they were only left in the hierarchy to make the selection of links easier, when using the physique modifier.

Set the Drop-down-list in the “Object Export” section under “Export To” to “Character (*.chr), and click the “Export Nodes” button. This exports a compiled version of your object to the same folder your max-file has been saved to. If you want to specify a different name for your character (which is usually generated from the name of the max-file) you can specify one by activating the option below the “Export To” drop down list. Exporting is only possible to the same folder that the max-file resides in, or to a sub-folder from that one.
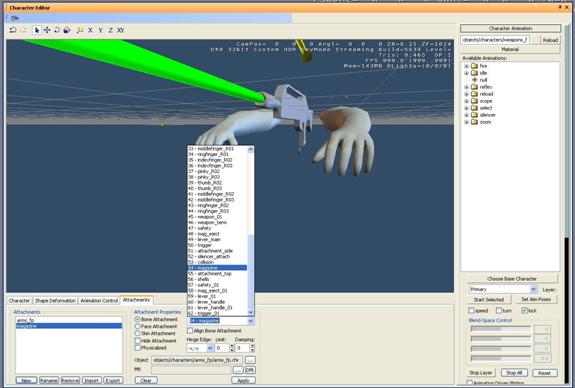
Now you can open the Character Editor under “view” in the editor…
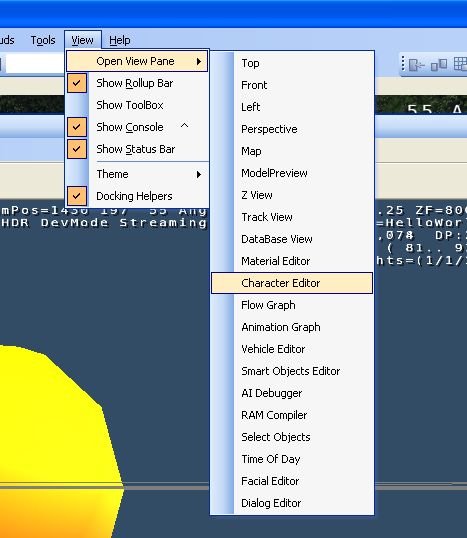
…and load your character.
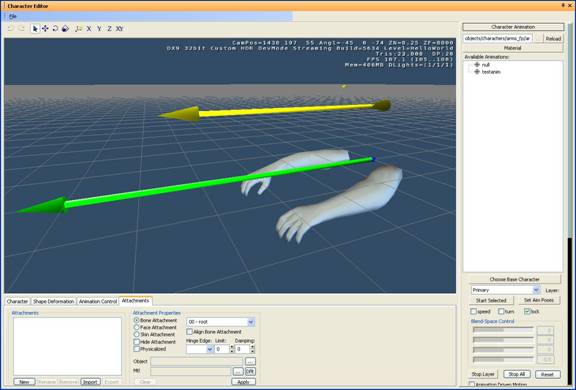
The big green arrow shows you the “forward direction” in the engine, which all characters should be facing to (Y+).
Tip:
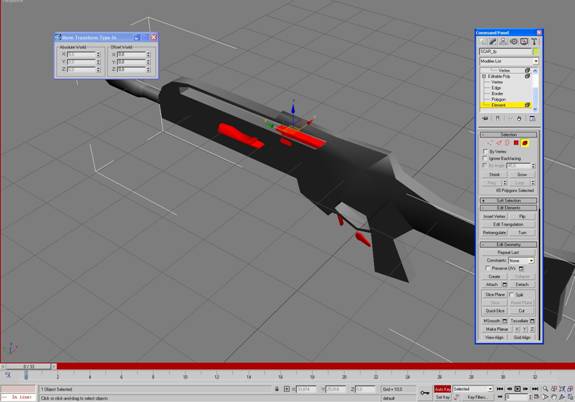
To make the weighting process more convenient, you can move away the parts which are meant to be animated later and should get their own bones, by a known amount of units or its multiples. Later after you applied your weighting modifier you can easily move them back to their original position by animating the bones they have been weighted to, the same amount you moved them apart from the main model earlier.
For the geometry the same rules apply like have been pointed out in the arms section. No translations should be applied to the geometry, and before applying the weighting modifier do a reset-x-form, and collapse it in the modifier stack, to get rid of unwanted transforms. The pivot should be aligned to the world coordinate center, and the model should point in the positive y-direction.
All those names can be changed code wise of course; the names here are for demonstration purposes.
Weapon Term: used to attach the muzzle-flash effects to. Shells: used to attach the particle effect for the shells to. Collision: used for determining the position of impact when used as a melee weapon. Various attachment helpers, which are used to control the position of weapon parts. (attachment_top; attachment_side; attachment_bottom; etc)
Helpers or bones which don’t influence elements or parts of the weapon geometry, won’t need to be added to the deform modifier. Make sure they are added to the hierarchy before exporting the character, or they won’t be accessible by the engine.
Note:
Before a deforming modifier is applied, merge in the arms character from its source max-file, and parent the highest node from the weapon rig under the root bone of the arms character.
Hint:
When using the Physique modifier chose the highest node in the hierarchy with which you want to deform your mesh upon initialisation.
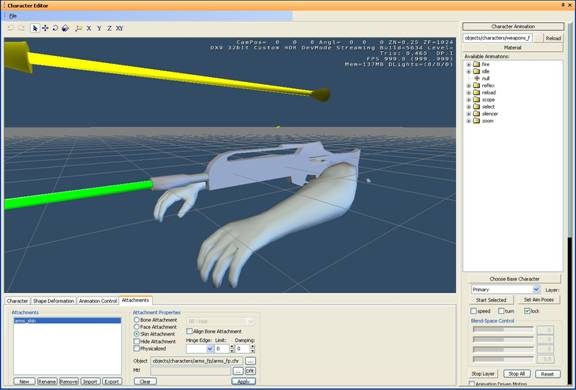
In order to view your character in the Character Editor with the mesh skinned to the bones, you have to add them as a “skin attachment” by setting the choice to “skin” in the attachments properties, selecting the arms object, and then creating a “new” attachment. After you hit “Apply” the character is attached to the bones, and becomes visible in the editor.
Tip:
You can also create a free camera at the world coordinate center which is looking in the direction of the positive y-axis. When you set its FOV (field of view) to the same value you use in-game, it becomes an accurate representation of what your animation will look like from the players view. You can also use “link constraints” on the camera to a helper called “camera_helper”, which is parented to the “root-bone” of the arms character, and later activate the camera control parameter for specific animations to let them be controlled by this helper. Mind, that the start and end frame of the animation for the camera should always start and end at the world coordinate centre to prevent unwanted “jumps” in your animation in the engine, between animations which have this helper activated and those which haven’t.
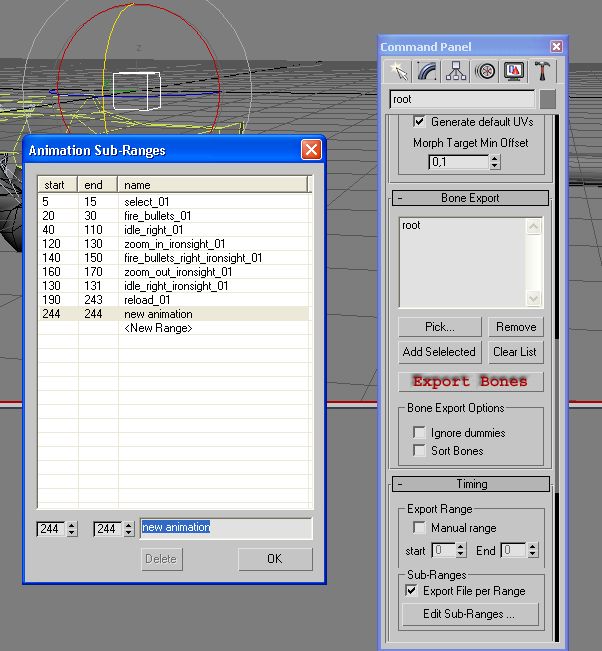
Once you set your time range, you can move on to the exporter. Make sure the right object is added in the node section of the objects pane. This should automatically add the root of your character in the “Bone Export” list. If not, do so manually. Hit the “Export Bones” button, enter the desired name of the animation and save it to the folder you entered earlier in the animations.cba file.
To preview your animation in the Character Editor, you have to create one more file which tells the engine which animations are available for this character (a “cal-file”). Below is the cal-file for the example weapon. It has the path of the animations folder in it, and the names of the animations, and their binary counterparts, like they would be called “on disk”.
Scar_fp.cal
= Animations\1st_person\SCAR_fp\
select_01 = select_01.caf fire_bullets_right_01 = fire_bullets_right_01.caf idle_right_01 = idle_right_01.caf reload_01 = reload_01.caf
zoom_in_ironsight_01 = zoom_in_ironsight_01.caf fire_bullets_right_ironsight_01 = fire_bullets_right_ironsight_01.caf idle_right_ironsight_01 = idle_right_ironsight_01.caf zoom_out_ironsight_01 = zoom_out_ironsight_01.caf
//layers control placement of attachments
silencer_on_layer_01 = silencer_on_layer_01.caf reflex_on_layer_01 = reflex_on_layer_01.caf scope_on_layer_01 = scope_on_layer_01.caf
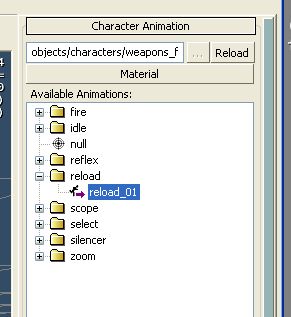
The file needs to be saved to the same folder the character is saved to, and has to have the same name, except for the file extension, which is “.cal”. The file path which points to the animations folder is relative to your games root folder. Once you entered all available animations into the cal-file, and exported them from 3ds max, they will show up in the “Available Animations”-list in the character editor.

The second option to export animations is to use the “Sub Ranges” dialog, in the “Timing” pane of the CryENGINE® exporter. You can add animations into the list, by highlighting the “new range” entry and typing the name of your animation. Make sure the start and end times are entered correctly. Check if the root of your character is still showing up in the bone list. When you activate the “Export file per range” in the “sub ranges” area, after hitting the “Export Bones” button, the exporter will ask for a location, and will export any of the entered animations from the “sub ranges” – list.
Layers are also used to control placement of attachments on weapons. In this case the silencer and the magazine are solved as attachments.
To export layered animations you have to make sure that the bone list only contains the highest node of the parts that should be influenced.
Also for these kinds of layers you might only use a static pose. To achieve this activate “manual range” in the timing pane of the exporter and set the start and end frame to be the same time.
After the animation is exported and added to the cal-file, you can test it in the Character Editor.
To add an attachment to your character, you have to create a new one in the attachments pane of the Character Editor.

In the attachment properties select Bone Attachment and select the bone you want the object to be attached to from the drop down list. (silencer_attach, in this case). After you have selected the correct object from the objects browser, you can create the new attachment and click “apply” to load it into the editor. It should show up at the default position of the bone you selected when you created the attachment.
To test the layer, you can activate a primary animation on the base character (i.e. an “idle” animation) by selecting one from the “available animations” list. Then switch to one of the “secondary” animation slots in the character animation pane, and select the layer animation in the list. The parts of the animation which were triggered from the “primary” animation on this bone should be overwritten, by the new layered animation.