In the Crysis Game script, there are two types of picking behavior:
The player will pick up the object with his left hand and holds the object in this hand. The weapon in his right hand is still usable. If the player holds a two-handed weapon, the weapon will be switched to the fists.
The Player will pick up and hold the object with both hands. The hands itself are not visible in the fist person view. No weapon is usable during that.
USe the "Local" Coordinate system when adjusting the rotation of the grab-helper.

Example Hierarchy

Setting up the helper:
Name it “ grab_onehanded_01 ” (name needs to be correct!)
Proceed with export
File
Example Hierarchy

Setting up the helper
Name it "grab_twohanded_01" (name needs to be correct!)
object, so the player can see the object, since he can not see his own hands in two-handed mode.
Proceed with export
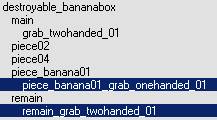
When a destroyable entity is destroyed, it will spawn pieces as well as a remaining object. These objects can be set up as pickables too.
The process is equivalent to the one for one-handed and two-handed pickables, but the name of the object the helper is linked to needs to be added as a prefix in front of the helper name (e.g. remain_ grab_twohanded_01). A grab-helper for the non-destroyed version of the object (“main”) does not need to have a prefix.
File
Example Hierarchy:
Basic Setup in Max:
for your object. Name it as described in the overview (e.g. remain_ grab_twohanded_01 or piece_banana01_ grab_onehanded_01).
object.
In most of the cases, the helper should be positioned below the object, so the player can see the object, since he can not see his own hands in two-handed mode.
Note: The pivot of these spawned pieces/remain, that you can see in your DCC-tool, doesn't match necessarily the entity position in game. This means, that placing the helpers for these objects could require a bit more of "trial and error". It should be a good idea to use always the non-destroyed version of the object as reference to align your helper.
should be pickable.
Proceed with export
During the Crysis development we developed an advanced technique to align one-handed grab-helpers to pickable objects in 3D Studio Max. We created a template file that contains the player’s arms in the grab-pose that will be seen in the first person view of the game, and a camera that replicates the first person-camera of the game. It is also a grab helper included that is connected to a helper with a transformation-constraint. This makes it easier to rotate the whole template file and the grab-helper at the same time without unlinking the helper.
The key about this technique is to rotate the whole arms-template including the grab-helper, until the result looks as desired in the first person camera.
The disadvantage of this technique is that the scene might become complex, especially if more than one template is merged into the scene. Efficient layer usage will become helpful for this.
Pickable helper template file:
Setup in 3D Studio Max:
1
Merge in the ”pickable_template.max”-file. Select all the objects in the merge-window 1 Link the “grab_onehanded_01” helper to your object. 1 Adjust the position and rotation of the “pickable_template”-helper until you are satisfied with the position. The “grab_onehanded_01” helper is constrained to the “pickable_template”, so it will inherit all transformation changes of the “pickable_template”-helper
Proceed with export
Example for a well aligned pickable helper template:
Note: Everything linked to this object including all the sub-objects/helpers will be exported into one file.
Example-properties of a pickable entity:

Non-AI-Characters can be set up to be pickable, too (Animals for example).
In this case we can not set up the grab-helper attachment in a DCC-tool but in the Character Editor.
The grab-helper will be will be added to the character as a bone attachment. So the orientation of the helper is dependent on the bone it will be attached to. You don’t necessarily need to apply an object to the attachment, but for easier alignment it is recommended to use an object with a clearly visible orientation. The object will be removed from the attachment later on when the desired result is achieved.
Attachment Creation:
1
Open the .chr or .cdf file you want to make pickable in the character editor. 1
Add a new attachment. 1
Apply this attachment as a bone-attachment to any bone (preferably root-bone of the rig, since it is not animated) 1
Move and rotate the object until you think it might be aligned correctly later in the first-person view.
1
Save your work as a .cdf file. 1
Place your animated non-AI character in the Perspective view in Sandbox (Animals are usually placed from the ArchetypeEntity Library). 1
Go into game-mode, pick up your animated non-AI character and see if its alignment looks as desired in the first-person view.
1
In order to remove the object that was used as helper for the alignment, open your .cdf file in Notepad and remove the object path 1 Repeat steps 4. - 7. until the desired result is achieved.
During the alignment: 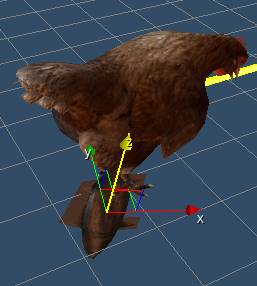

After removing the Object path in notepad:


 pickable_onehanded.max
 Example 1